
I’ve been dabbling with Home Automation a little bit over the past few months. We’re moving house soon, and my aim is to set up the new house with all the mod cons that a smart home can provide. There is a vast array of features which I can choose from and program in, from the obvious helpful automated lights powered by motion sensors, to the novelty of having Alexa welcome individuals home when you walk through the door, to the energy-saving assistance of smart radiator TRVs, to regular bedtime routines and alarm calls throughout the house.
So far I’ve done all this using my PC as the main home automation server. It runs OpenHAB 3 as a control centre, with a Mosquitto MQTT server running as a service, and a Zigbee USB Hub feeding into it via Zigbee2MQTT. Alexa is cloud-based and is connected to the OpenHAB server, and a MyOpenHAB Cloud server allows access remotely. But my PC is used for other things, is not always turned on, and runs on Windows. This is not ideal for something as important as an entire home automation server.
The Raspberry Pi
Enter the Raspberry Pi. If you haven’t heard of this before then you are missing out on a large portion of modern computing history. The Raspberry Pi began its development in 2006 with the target of providing very low-cost computing to everybody, but in particular to schools. By 2012 the single-board computer provided everything you need for a PC for just £25. Today the Raspberry Pi 4B comes with 4 USB ports (2 of which are high-speed USB 3.0), a Gigabit ethernet port, 2.4GHz and 5.0 GHz 802.11ac wifi, Bluetooth 5.0, stereo audio, support for two monitors through mini-HDMI (up to 4kp60), and a Micro-SD card slot. It is powered by a quad-core 1.5GHz 64-bit processor and has either 1GB, 2GB, 4GB or 8GB of SDRAM. By any measure, this single-card computer punches way above its weight!
For my purposes – running an OpenHAB server 24/7 – I only need the 2GB model and I’ll only run a 32bit OS when I install that. In fact, if you went for the 8GB and 64bit model you may see temperatures go a little high. I managed to find (eventually) a device in stock at the Pi Hut. Stock has been scarce for this latest 4B model for a little while due to various global crises, so I snapped it up. Prices for the 2GB 4B as a board only are set at £44, while the 8GB 4B is £74. The starter kit for the 2GB is only £22 more at £68, and the 8GB starter kit is £98. The starter kit is well worth it, unless you’ve already got the rest of the stuff, so that’s what I purchased.

The kit arrived from The Pi Hut on next-day delivery, and I rushed to open up my new toy! The starter kit comes with everything you need to get it up and running. Obviously the Raspberry Pi 4B itself, which just looks like a small motherboard (which it sort of is), a 32GB MicroSD card which contains a pre-installed NOOBS operating system, an official Raspberry Pi 4 case which fits together nicely and protects the Pi from damage, a Micro-HDMI cable for connecting to a monitor, and a USB-C cable and official Pi Power supply adaptor.
While tempted to plug it in straight away, this kicks off the automated installer, so I hanged fire until I was ready for that to happen. First though, I put the Pi into the case snugly (it just pushes in and presses into the corner holes to hold firmly), closed the lid, and checked that everything fit together correctly.

Initial Setup of the Raspberry Pi
Installing the required software on the Raspberry Pi was actual quite straightforward. I used the OpenHABian image, produced specifically for running OpenHAB on the Raspberry Pi. I downloaded the image and the official Raspberry Pi image writer, opened up the image writer, selected the image, and selected the RPi SD card (which was now in the PC). After that I hit WRITE and the writer removed the existing software from the SD card before filling it with the new operating system.
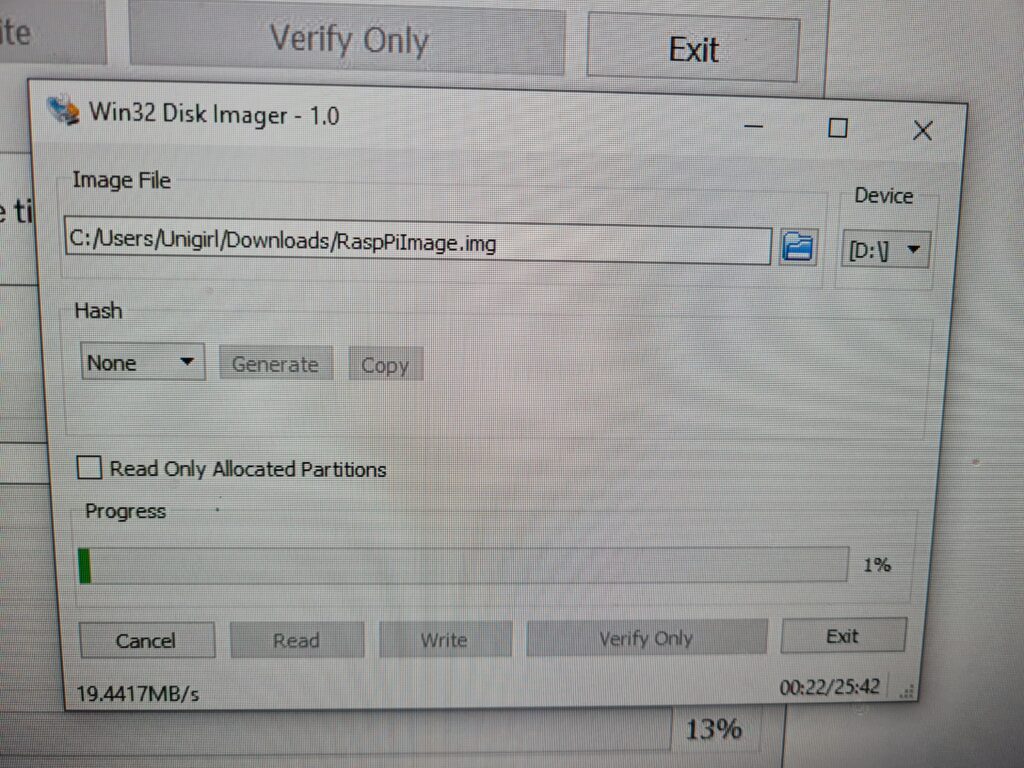
To carry out the first install of the Raspberry Pi you are best plugging an ethernet cable in. The SD card goes in one end of the Pi, and the USB-C charging cable will power it up when plugged in. Everything happens automatically, which means you can do a headless (no monitor / keyboard) setup. If you want to view the status you can plug a monitor into the Pi using the provided Micro-HDMI cable.

The Pi will be ready for use in around 30 minutes. In this time it has downloaded the various updates for Raspian and OpenHAB,,,,,
Mosquitto MQTT Server Installation
I have a lot of Zigbee devices. I currently have the Zigbee adaptor plugged into my PC, and both a Zigbee2MQTT server and a Mosquitto MQTT server running on there. These need to be moved across to the Raspberry Pi. The easy one is the Mosquitto MQTT server, as it is included as an optional extra in the OpenHABian image.
You will need to be on the SSH terminal (open via the command prompt, type SSH openhabian@192.168.0.10 then openhabian when prompted for the password, assuming default passwords). On the terminal type sudo openhabian-config to enter the config screen. Navigate using the arrow keys to the optional extras option, press enter, and then select the Mosquitto MQTT Server option. It will prompt for a new password. I left it blank for ease, but added a password later for security. Let this install and then exit the menu.
Zigbee USB Hub Installation
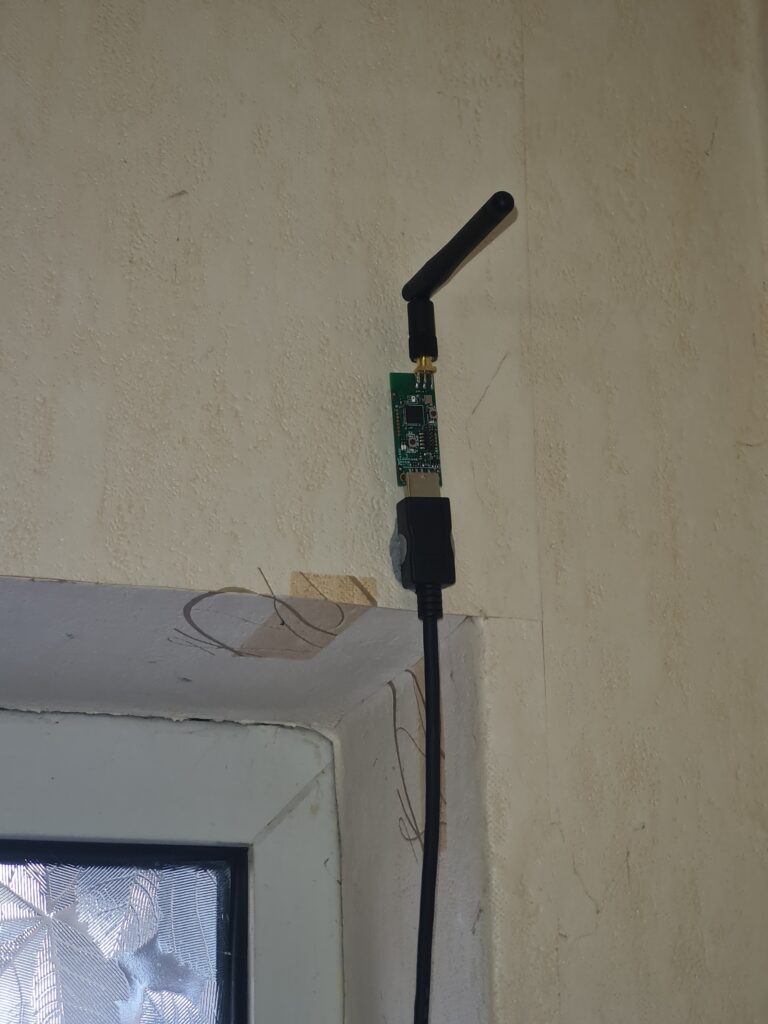
Secondly the USB adaptor needs fitting. I have a CC2531 Texas Instruments chip, with an integrated antenna. This is a very common USB hub for this purpose, but has a drawback in that any radio interference will significantly reduce the range of the Zigbee network. This is true for all hubs. The solution is to have a long USB extension cable which separates the USB adaptor from the Raspberry Pi. I have them fitted under the stairs with the USB adaptor as far from any interference as possible. As well as physically fitting the adaptor into the Pi, you must determine the port it is fitted into. To do this use the terminal again and type sudo dmesg. This will give a long list of parameters, but towards the bottom it has the usb device with the appropriate model number (TI CC2531 USB CDC). What you are looking for it the port, which in my case was ttyACM0.
Zigbee2MQTT Service Installation
Finally the zigbee2MQTT software needs to be installed. This runs in Node.JS, so you need to run (again in the terminal)
sudo apt-get install -y nodejs npm git make g++ gcc
Next clone the github repository where zigbee2mqtt is stored, and move it to an appropriate folder.
git clone https://github.com/koenkk/zigbee2mqtt.git
sudo mv zigbee2mqtt /opt/zigbee2mqtt

cd /opt/zigbee2mqtt
npm ci
The npm command installs the package and does come up with a number of errors which can be ignored.
The software is now installed, but you may have to make a couple of changes to the config. In the event, I didn’t need to, but that was probably more luck than anything else! Use the terminal again to open the configuration.yaml file for editing:
nano /opt/zigbee2mqtt/data/configuration.yamlThis will show the following file in the nano editor:
# MQTT settings
mqtt:
  # MQTT base topic for Zigbee2MQTT MQTT messages
  base_topic: zigbee2mqtt
  # MQTT server URL
  server: 'mqtt://localhost'
  # MQTT server authentication, uncomment if required:
  # user: my_user
  # password: my_password

# Serial settings
serial:
  # Location of the adapter (see first step of this guide)
  port: /dev/ttyACM0
Note that this is a much different editor from what you may be used to in Windows. The options at the bottom are selected using ctrl+??. You can navigate around the screen using the arrow keys and edit the text directly. If you are installing this on the same Raspberry Pi as the Mosquitto server then you can leave the server as mqtt://localhost. Otherwise it would be the address of that device. If you set up a username and password on mosquitto then you will need to uncomment (remove the #) and type in the username and password for this. Finally the port name should match the name you wrote down earlier from the zigbee adaptor port.
When the file is edited, press ctrl+O to save, and ctrl-X to exit.
You can test that the server is correctly set up by typing in the terminal:
cd /opt/zigbee2mqtt
npm start
This runs the zigbee2mqtt software once and stays running until you press ctrl+C. You should see a bunch of lines setting up the server, including one saying Connected to MQTT server. If you got this then it’s working!
You won’t want to have this running manually though. You will want to set up a service to run on startup and stay in the background. To do this you need to use that nano editor again:
sudo nano /etc/systemd/system/zigbee2mqtt.serviceThis time it runs using sudo, so it will ask for your openhabian password again (openhabian). It will create a blank file which you will need to fill in. Type the following in, carefully:
[Unit]
Description=zigbee2mqtt
After=network.target

[Service]
ExecStart=/usr/bin/npm start
WorkingDirectory=/opt/zigbee2mqtt
StandardOutput=null
systemd.exec(5)
StandardError=inherit
Restart=always
User=pi

[Install]
WantedBy=multi-user.target
Once you’ve written that in, and checked it over, press ctrl+O to write to the file, and ctrl-X to exit the editor.
You will want to check that it works correctly, and check the output. Type the following:
sudo systemctl start zigbee2mqtt
systemctl status zigbee2mqtt.service
You will see some info about the service, including that it is active (running). Now you want to enable it so that it will run automatically on startup:
sudo systemctl enable zigbee2mqtt.serviceUsing MQTT Explorer to See and Send MQTT Messages
Now everything is set up between your Zigbee Hub and the MQTT you will want to confirm that the messages are finding their way across. You can install MQTT Explorer on your PC to interface with the MQTT server. Visit the website, download the installation files, and install it. You’ll need to fill in the details of your server when you open it up so it can log on. This should be simple as it is just the IP address of the Raspberry Pi, port 1883, and possibly a username and password that you set up earlier.
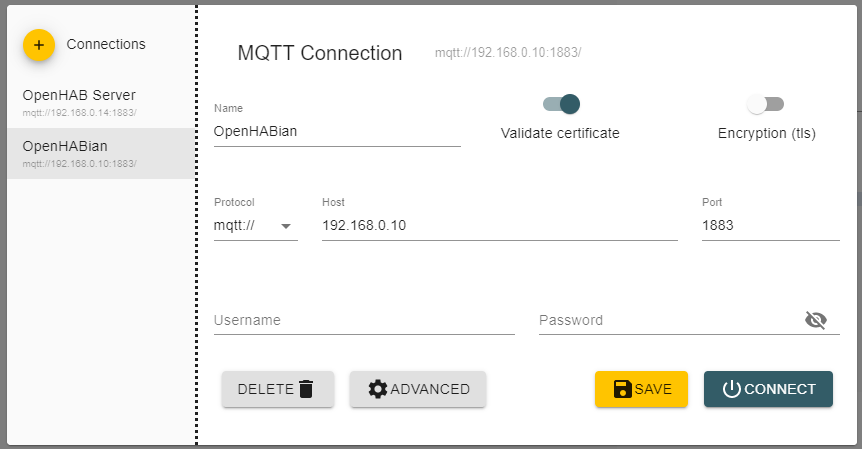
When you connect you will be able to see the traffic between the devices on the network. There may not be anything there just yet, but when you get some additional devices on there the messages will flow continuously.
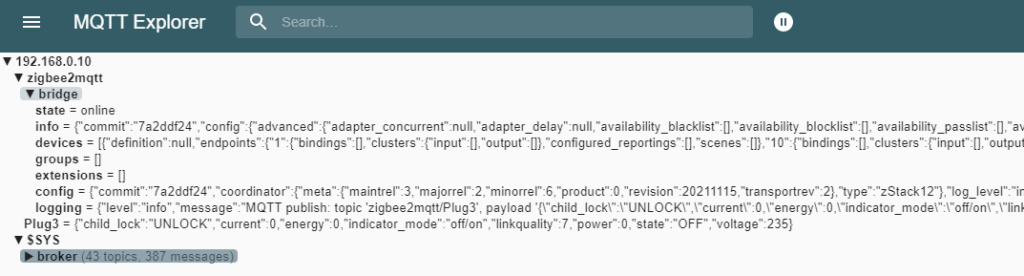
MQTT depends on messages being published to topics on the server and devices subscribing to those messages to see anything that affects them. When a new message is published on an existing topic/subtopic it will over-write what is already there. You will probably just have messages on the topic zigbee2mqtt at this stage. There will be a bunch of sub-topics branching off from that – firstly you should have zigbee2mqtt/bridge which is anything to do with the Zigbee Hub. On the large area at the left you can see the current status of all messages. There are several sub-topics below the bridge one on the screenshot below, and on some of them the data is given in JSON format to allow more data to be held.
Subscribing and Publishing MQTT
At the right you will see a bit with Value and Publish. The Topic/Value section displays the message currently held in whatever sub-topic you click on. This will change if it is updated. I’ve clicked on the state section at the left and the right shows me the following. The main part is that the current message is online.
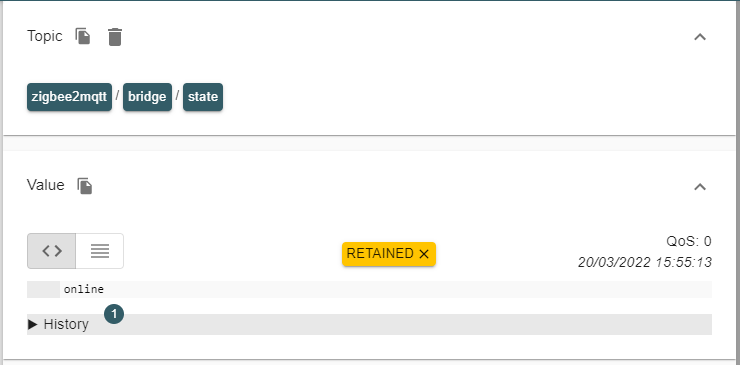
Below this is the Publish section. This is how you can control the server by publishing your own messages. One message you will want to learn is how to turn on / off the pairing facility on the Zigbee Hub. Type this on to the topic line:
Topic
zigbee2mqtt/bridge/request/permit_join

json
false
You should see the light on your Zigbee Hub go off and you will no longer be able to pair devices to it. You should do this whenever you are not adding new devices as it is a security risk to leave the network open. Simply change false to true to switch pairing mode back on again.
Another message you may need is this one:
Topic
zigbee2mqtt/bridge/config/rename

json
{"old":"0x0012345678","new":"DeviceName"}
This renames a device which is linked to your zigbee network. As a default the device will have a nonsensical name such as 0x0012345678. You will probably want to change this to a more human-friendly name (shown here as DeviceName).
The third message you may want is this one:
Topic
zigbee2mqtt/bridge/networkmap

json
graphviz
This sends a message to the built-in network mapping function which tells it that we want a map producing in the graphviz format. It will take a minute or two, depending on how many devices you have, but there will eventually be a return message on that topic with the information you need to draw the map. You should click on the topic at the left and at the top right you will see the graphviz data. Copy this. Go to an online graphviz site and paste the data into the box provided.

There are more commands to use, but you can research those later. Google is your friend!
Linking Mosquitto MQTT Server to OpenHAB
You’ve got your USB adaptor plugged in, sending information to your zigbee2MQTT service, and having it forwarded on to your Mosquitto MQTT server. The information is being broadcast from there, but OpenHAB doesn’t know yet how to receive it.
Open the admin page for your OpenHAB install through a web browser. The address should be http://openhabian:8080, or possibly http://<ip address>:8080. On first use it will ask you to select a new username and password. Remember these for later. You will also be asked to install your chosen bindings. If you know what you need then you can choose them at this stage, or just do it later as and when you need them. Navigate to the Administration section and select Settings -> Things and the large Plus sign at the bottom right to install a new Thing.
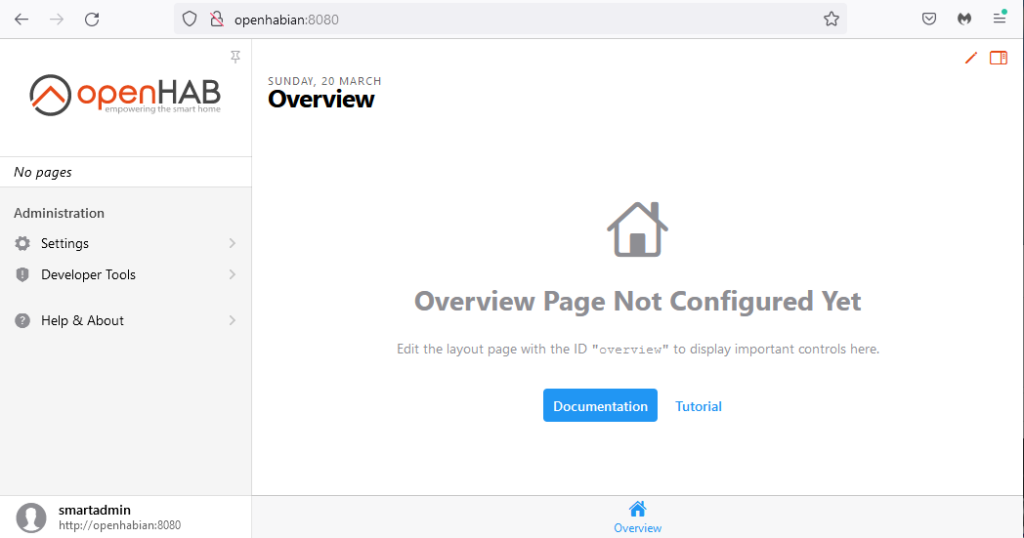
If you haven’t got the MQTT binding already installed then click on Install More Bindings at the bottom. Find the MQTT binding and press install. Go back to install a new Thing.
Select the MQTT binding and choose MQTT Broker at the top. Now you need to fill in some info about your Mosquitto MQTT server. You should type in a name for the broker which makes sense (I used MosquittoBroker). Then the IP address of the server, or localhost if it is on the same device. No port is required here unless you’ve changed the default from 1883. If you set a password for the Mosquitto server then press Advanced and scroll down to the username / password section to fill them in.

Save the Thing and go back to the Things list. If you have the server running, and the broker correctly configured, it should show up as Active. If not then click back in to the broker and there should be an error message which will assist.
All Finished
At this stage you should have a fully operational Raspberry Pi 4B, running OpenHAB 3 with a Zigbee network and MQTT server built in. You can access all of this from your PC or mobile device. The next steps are up to you and how much smart home automation you want to provide. It is beyond the scope of this article, but you should be looking into adding Things and Items on OpenHAB, and writing Rules to determine what happens when. You can link Alexa or Google Home to your OpenHAB server to use their features, and any manner of smart gadgets that you should need to. You will find that there is a Binding for almost all devices, and if not you can usually link them to Alexa and then link to the device via Alexa instead.
For quick reference, here are the default access addresses and passwords for the various interfaces we have just installed:
| Raspberry Pi Linux Shell via cmd | ssh openhabian@openhabian | openhabian | openhabian |
| OpenHAB Settings via Browser | http://openhabian:8080 | Set up on first use | Set up on first use |
| OpenHABian System Setup via shell | sudo openhabian-config | openhabian | openhabian |
| OpenHAB Log via browser | http://openhabian:9001 | ||
| Mosquitto via MQTT Explorer | Host <Pi IP> / Port 1883 | None unless set up | None unless set up |
| Samba via File Explorer | openhabian.local | openhabian | openhabian |