
Smart home automation isn’t always simple and easy. Zigbee devices are valuable for their low power consumption and the fact they don’t use up bandwidth and IP addresses on your WiFi router, but setting up and maintaining a Zigbee network can be a hassle. Not sure how I missed it, but Zigbee2MQTT has a great frontend which can be accessed in a browser from any device, so is incredibly useful when setting up your network or re-pairing each device.
What is Zigbee?
Zigbee is a communication protocol which operates within the IEEE 802.15.4 specification using radio bands 2.4GHz, 900MHz and 868 MHz. This means that it shares radio space with WiFi. Zigbee is a mesh protocol, meaning that potentially each device connected can become a separate router and extend the network further and further away from the main Coordinator.
The range of a Zigbee device isn’t very far, but the nature of the mesh network means that this isn’t necessarily a drawback. Anywhere you can get mains electricity you can add a repeater to extend it further.
Zigbee2MQTT is a piece of software which integrates the Zigbee devices via one messaging protocol (MQTT) into a single mesh, instead of having lots of proprietary Zigbee bridges or hubs around. It is open-source, but built and maintained primarily by Koenkk. There is plenty of support around for Zigbee2MQTT and it has become very popular for home automation systems, particularly when integrated into OpenHAB or Home Assistant.
Zigbee2MQTT Frontend
If you have a Zigbee2MQTT server installed, you may be struggling to view the messages sent to and from it. Some older guides recommend the use of MQTT Explorer, an application you can install on your PC which can see the messages and interact with the server. This is great, and I used this for a full year before finding out that there is an even better alternative.
Zigbee2MQTT now installs with a built-in frontend. For example, you may have this installed on a Raspberry Pi server with a server name of http://openhabian. To access the frontend you need to have it switched on (it is by default) which may mean changing the configuration.yaml file to add frontend=true. If you’ve got an installation of Zigbee2MQTT you will be well aware of this file and how to access it. Then simply go to http://openhabian:8081 to access the frontend.
What does the Frontend do?
Well, it can do anything that MQTT Explorer can do, and it can do a little bit more besides. One of the really great aspects is that it can be opened on mobile devices as well as your PC browser, so it becomes much more mobile.
1. Device List
Firstly it will show you a nice tabulated list of devices, with images and useful info about each. You can rename and delete devices directly in this list, which is great for setting up a network from scratch, especially on your phone or tablet.

2. Dashboard
The dashboard is a panel-orientated view of each device, with many of their switches available to press directly. This is handy to manipulate and view multiple devices at once.

3. Map
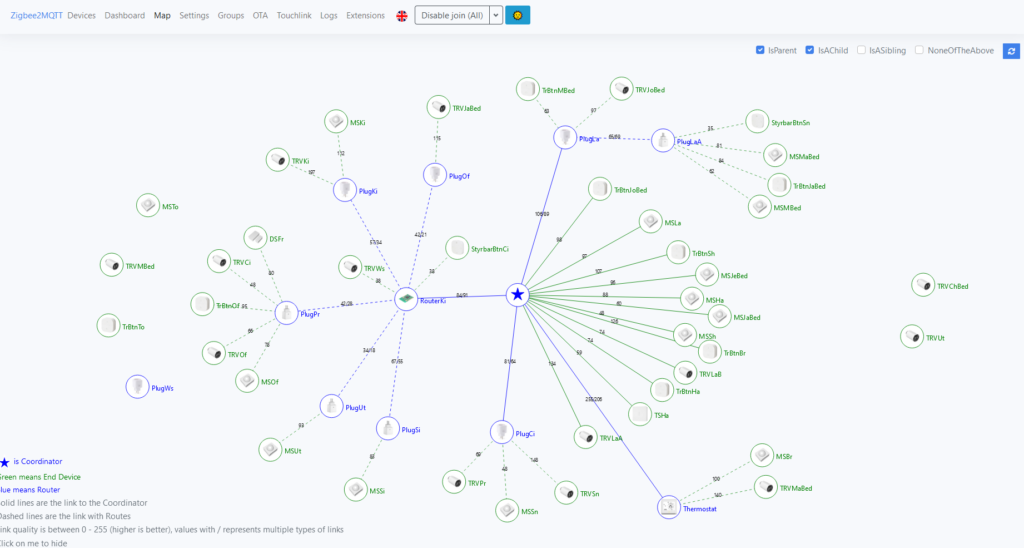
This is a fantastic place to view the Zigbee mesh route map. Until now I was using MQTT Explorer to publish a message to create the map, and then copying the returned data on to a Graphviz website to view an image of the map. On the frontend, however, the map is automated, and it is interactive as well! You can’t see it here, but the devices move around on the screen to spread out and make themselves visible, and you can move the nodes manually as well to get a good image. I like to untick the IsASibling option at the top and then you just get all the actual routes showing connectivity of the devices. Super for trouble-shooting router placements.
4. Settings
This is where the Zigbee2MQTT server can be modified and interacted with. There are even pages on here to add external convertors for unrecognised devices or home-made devices.
Other Pages
There are a few other parts as well, such as being able to group your devices together (which adds extra structure to the MQTT part) and checking the log files. But this is already a fantastic tool, and I have no idea how I made it so far without it.